How to scan your system with Maldet? I had discussed in a previous essential post about 17 tips of enhancing cPanel server security scanning with Maldet. Hence, a lot of you ask me the procedures of installing, scanning and configuring Maldet on your server. So, I have tried to explain it here.
In this knowledgebases article, we will learn—How to install, scan or configure Maldet on your server. Let’s discuss about Maldet and why it is necessary and how to work with it accurately.
Why Maldet?
Maldet which is also known as LMD or Linux Malware Detect. It is a Malware Detection software package for Linux system. We know, Linux is always more secure than Windows. Although Windows has many malware detection software, Linux has few. Maldet works here very good.
Hence, to give extra security of your cloud server, Maldet works to scan Malware effortlessly. But what has made Maldet unique than any other software or anti-virus? It can be used for any hosting package including Shared Hosting. I think it is a great chance to detect malware in the Linux system.
How to install Maldet:
Let’s see how to install Maldet in your server. Check the screenshot if needs. No problem if you copy and paste the code to follow the command.
- First login to your server as admin or root user.
- It is not possible to download the software from any online repositories. For this reason, you need to download it first from here. Follow the below command to download it now.
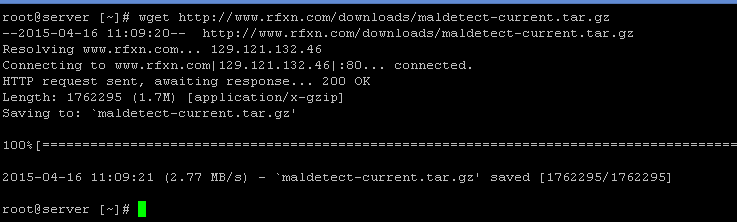
wget https://www.rfxn.com/downloads/maldetect-current.tar.gz
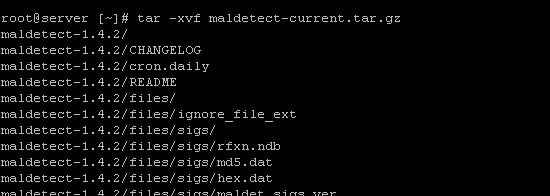
- Now you have to extract the file following the below command.
tar -xvf maldetect-current.tar.gz
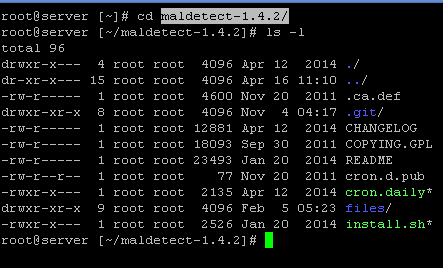
- Here, you have to move to the Maldet directory. So, use the below command.
Cd maldetect-1.4.2

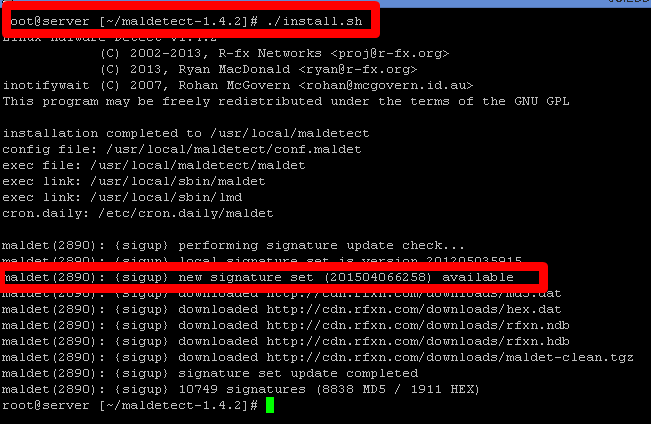
- After extracting and moving to Maldet directory, you need to give the installation command. Do it as like the below.
./install sh
How To Configure/Run/Scan with Maldet:
When you want to run Scan, you have to take a new screen always. Sometimes it takes hours of work to scan the whole system according to the disk space. When you want to run a scan, follow the below command.
maldet -a /path/to/scan
OR
maldet –scan-all /path/to/scan
At the same time, you can simply run a scan of the full system following the below command.
maldet -a /

When the scan is complete, if you would like to see the reports, you can run the below command. You have to use actual ID of you rather than the demo I use in the below.
maldet –report SCAN ID
Ex: maldet –report 062617-2220.1771
To get separate results or getting individual reports, run the below command.
maldet -q SCAN ID
Ex. maldet -quarantine 062617-2220.1771
How to Automatize Maldet:
If you want, you can automatize the Maldet scan. Similarly, to make the process easier, you can get email alert also. Let’s see how you can do this.
- Set email_alert to get email into the configured email account with 1.
- You can set email_addr to get scan reports as well.
- If you want to get email alerts for new threat, set quar_hits to 1 and it will move the malware into ‘/usr/local/maldetect/quarantine‘
- You can also get enable account suspension or shell access to non cPanel users from quar_susp to 1 and‘/bin/false‘.
To Sum It Up:
Hope you have understood the method of installing and configuring Maldet alongside how to scan with Maldet. It is simple and straightforward method. If you need any further support, make a comment. Our experts will surely help you. Similarly, for reliable dedicated or VPS server you can contact with SpeedHost team. To take experts support you can talk with us also. All the best.