Securing your website is a complicated task. The enemies are looking forward to stop you. We take care of our website using security plugins or installing SSL or using CDN. But we forget about the most important matters that is cPanel. It is your hosting panel. For this reason, the hackers can take control of cPanel and this would be easy to grab the files and data of you. In this post, we will learn how to enhance cPanel security following some easy steps.
When it comes to your hosting security, cPanel comes to secure first. If your server is not secure, you are always in danger. To prevent attacks, you need to follow some ways.
It will surely ensure a secure server. The data will be safe in your hosting drive. The stored data is your assets. So, taking care of it is your first priority.
So, in this tutorial of Speed Host, we will learn all the ways of enhancing your cPanel security.
Also Check: Ways to Quickly Speed Up Your WordPress website.
Simple Ways To Enhance cPanel Server Security:

1. Define Secure Password:
Your first and foremost duty of enhancing the cPanel server security is—defining a secure and strong password. A strong password can protect your site in the first attempt. The hackers first try to break your password system to enter or steal data from your site. For this reason, you have to ensure and double-check you are using a strong password, which is unbreakable enough.
You should select different passwords for different websites or services. Generally, you need to set a strong and unique password for the essential websites. For example, where you keep important data, bank details or other personal information. Of course, cPanel, FTP or other web data related sites are important. So, keep a unique password here.
At the same time, enabling SSL from “Tweak settings” on Server Configuration ensures extra security when logging in.
If you permit user-level individual login ID on your cPanel, don’t accept a weak password. Suggest to them how to generate strong and easy to remember password. To enrich a strong password, never use dictionary words or related dates, which can be guessed without any extra concern.
You can take the help of password generator tools to set up a strong password. It is online and you can easily generate a strong password according to your needs. For example, LastPass Password Generator, Norton and some general websites.
2. Secure SSH (Secure Shell):
SSH Or Secure Shell is a connectivity network protocol to access, manage or execute the sever remotely. It happens in a secure platform under an unsecured network. Although it is necessary to enhance SSH security for your server. You can do this following the below three tips.
- Change SSH Port Number: By default, SSH port is 22, which is easy to the victim of brute force attacks. For this reason, if you change the default port number, it would not be easy to take control of your server. How to change the port of secure Shell?
- First login to your hosting server using the default port.
- Now edit the default port number following this location —
/etc/ssh/sshd_config - When you update the port number from the Command Line, the command would be—
nano /etc/ssh/sshd_config - So, your work is updating the SSH port 22 to another number that you can remember.
- Finally, restart the SSH using command line code of—
service sshd restart

- Disable Root Login User: Disabling the root login user and creating a new user to access the server to add more security on the server. Let’s see how we can do this.
- You have to log in the server using SSH.
- As we will disable the root login, we need to create new login details.
adduser new_username_namepasswd new_username_name - You will need to use a password for the new user. Don’t forget to use a strong password with a letter, numeric and symbolic variations. Now add the following command line code in the wheel group
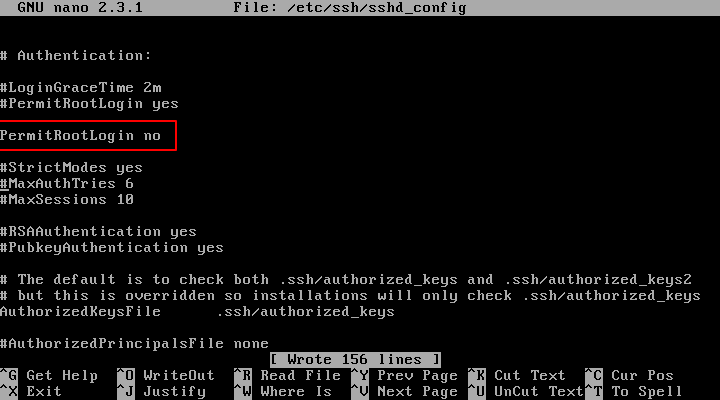
# usermod -aG wheel new_username_name - At this time, you have to disable the root login. To do this, you have to edit the SSH configuration. The location of this file will be found in this path—/etc/ssh/sshd_config.
- Change the PermitRootLogin option Yes to No.
nano /etc/ssh/sshd_config - At last, restart the SSH service. You can do this by following the below command.
service sshd restart
- Disable SSH V1 as You get SSH V2: The latest version of SSH, which is version 2, can do everything that was from version 1. That means there is no need for SSH V1. Similarly, it is less secure and outdated. For this reason, if you disable SSH V1, it will enhance the security of cPanel. How will you do it? Let’s see the easy ways.
- First, Login the SSH server.
- Now edit the SSH server configuration following the path of
/etc/ssh/sshd_config. - You will see the protocol line like below. You have to Uncomment it.
Protocol 2,1 - Now update the line with V2 only.
Protocol 2 - At last, Write the following command to restart the SSH service.
# service sshd restart
3. Enable cPHulk Protection
We know, brute force attack is very common in the web world. Generally, an automated system works to get the server information including password, username or similar information.
In this matter, cPHulk is a simple solution of this issue. It works to protect against any brute force or automated attack.
You just need to Enable the cPHulk protection from WHM. To do it, follow the below path.
Login to WHM→ Security Center → cPHulk Brute Force Protection and click on Enable.
To understand clearly, check the screenshot below.

You have to customize the options here. According to your need and username, you can set up custom options. When you will set up the configuration, it would not take any failed login attempts which you have mentioned on the setting. cPHulk will block instantly for further attacks.
Surely, it helps to secure the cPanel server in the simplest way.
Need to mention, when you use static IP, it is necessary to add it on the Whitelist Management. Otherwise, you may also fail to login after failed login several times. So, it will be another hassle for you. For this reason, to ensure security, you should also add the IP information on the Whitelist Management.
4. Setup ConfigServer Security & Firewall (CSF)
When it comes reliable security firewall for the cPanel server, the name of ConfigServer Security and Firewall (CSF) comes first in our mind. Unlike the standard firewall, CSF scan various authentication log files. It gives some extra facilities also. For example, it works on a regular basis for scanning and provides information to update the server or recommendations for improving security issues.
Alongside the most common features, CSF also ensures some additional features to guard your server. For example, View System Logs, IPTable Logs, IFD statistics will surely support to check the performance of your server or discovering the issues related to security matters.
How To Install ConfigServer Firewall?
It is straightforward to install as like other simple software or plugins. First of all, you have to download the setup file from their official website. It is completely free.
You can follow this step by step guideline of SpeedHost on How TO Install and Configure ConfigServer Firewall.
If you already follow the above steps, you can now configure (Enable) CSF from WHM. Please follow the screenshot.
- First login to WHP
- Go to the Plugins option and click on ConfigServer Security & Firewall.
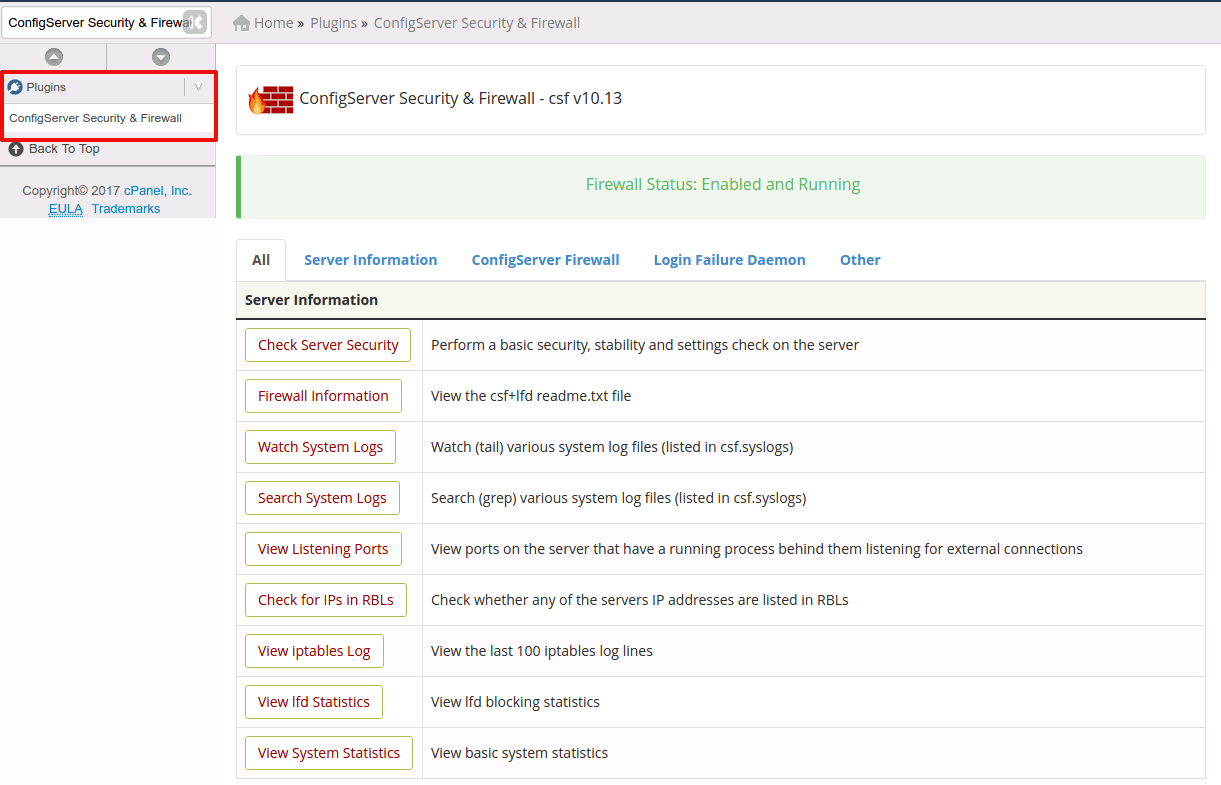
Here, you will get various options to enrich the security of your server. Enable it according to your need.
5. Setup ClamAV Antivirus
While using Linux Server, it is more convenient and strong for Virus protection than Windows Server. Although we see another Antivirus give a boost to your server.
In this case, ClamAV is a more popular and open source Antivirus that is used on cPanel as a plugin. It works on the home directory on the server to scan the files, emails and any potential issues in the first place. Here, you will get a detailed tutorial on how to setup ClamAV Antivirus.

Now, when you run the ClamAV antivirus, it will scan the home directory alongside email. You can also check here how to run perfectly the ClamAV Antivirus.
6. Switch to CloudLinux
CloudLinux uses the most secure operating system for the cPanel servers. Experts recommend it to get a reliable cloud system. Contact Speed Host to get more information about CloudLinux or for Cloud Hosting.
7. Disable Ping Request
We face “Ping of Death” and “Ping Flood” attacks due to PING requests. It is mainly a request of ICMP (Internet Control Message Protocol). To stay safe from those, we should disable the ping request service.
Ping Of Death is a attack with oversized packets where our server does not know how to deal with it. Similarly, Ping Of Flood is also a denial-of-service attack where the attackers play with the incoming and outgoing bandwidth.
How To Disable Ping Response?
You just need to run the below command to stop the Ping response.
echo “1” > /proc/sys/net/ipv4/icmp_echo_ignore_all
You can also disable Ping Response from the IPtables firewall. Follow the below command.
iptables -A INPUT -p icmp -j DROP
When you disable Ping response, there are no issues of this type of attack.
8. Configure Host Access Control
It is a really impressive feature to control access of the cPanel users in your website server. You can allow or deny some features from other users. Even you can give one IP for a specific feature. The only work is configuring the Host Access Control.
As brute force attacks work beyond the IP address, if you give access to the certain feature to the IP address according to your need, it is easier to enrich security.

After logging in to WHM, go to Security Center and then to control or configure Host Access Control, click on it. You can easily set up permission from here. Follow the screenshot to understand it clearly. Don’t forget to set Allow instead of Deny if you want to give access to any users.
9. Setup Mod_Security
Experts always warn us about Web Application Security. They try to reach the web application server to control you. Hence, using a Web Application Firewall (WAF) can increase security.
ModSecurity is such type of Web Application Firewall that is reputed and open source. It works fine against most of the vulnerable external attacks. For example, SQL Injection, Webshell/Backdoor Detection, iFrame attacks, Botnet Attack Detection, or HTTP Denial of Service (DoS) Attacks.
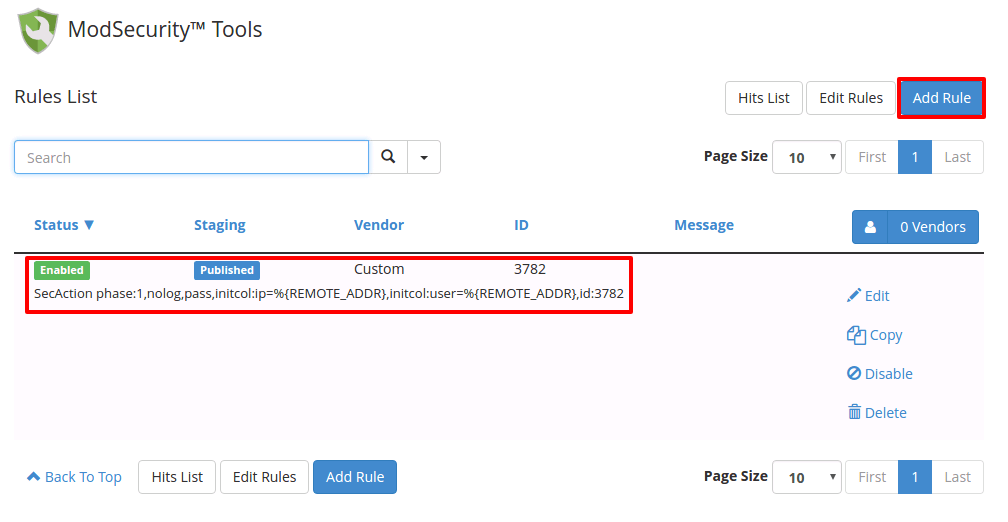
It is simple to configure Mod Security. You will get it under the Security Center of Easy Apache configuration.

If you describe further, you have to go to ModSecurity Tools to set or add new rules. According to your need, you can set New Rules to improve the security of your cPanel server.
10. Scan Complete System With RootKit Hunter
RootKit Hunter is one of the best UNIX based tool for scanning possible local exploits including rootkits or backdoors. It is also known as rkhunter. Installing it following command takes just a minute. Follow this tutorial to install, run and configure it. It works with a manual scan. Even you can keep schedule automatic scanning.
11. Scan System With Maldet
Maldet works for detecting Malware of your server. Maldet has come from the combination of Linux Malware Detect (LMD). It is mainly designed for Linux system to detect malicious files that are from PHP backdoors and darkmailers. It also checks regularly about other malicious files also. I suggest to check this tutorial on how to install, scan or configure Maldet on your server. As important we have kept it separate for detailed discussion.
12. Setup Cron Job To Run ClamAV
As I have discussed about ClamAV in the previous point, I need give importance on setting up Cron Jobs. Mainly, we add, update or change in our website, but we forget to scan with an Anti-Virus application. For this reason, if you set up a command on ClamAV, it will take daily or weekly automatic scan. When you are in off-hours, it can surely help the server from any malicious attacks. To run this cron, use the below command.
for i in `awk '!/nobody/{print $2 | "sort | uniq" }' /etc/userdomains | sort | uniq`; do /usr/local/cpanel/3rdparty/bin/clamscan -i -r /home/$i 2>>/dev/null; done >> /root/infections&
Staying away from spam or infected files in a regular basis, it would keep the server in a safe site.
13. Disable Apache Header Information
The enemies are always working to find out the newest ways to take control of your server. Since the Apache Header Data may be theft also, you can hide the information for public access.
If you follow the below step, you can hide the Apache and OS versions information.
- First login to your WHM dashboard.
- Then go to Service Configuration.
- Next, go to Apache Configuration.
- Now click on Global Configuration.
- Here set the rules to hide the information from public access. Keep Off of Server Signature and Select Product Only on Server Tokens.

Now, the information is safe and out of public eyes. Do it following the above screenshot.
14. Hide PHP Version Information
It is also important to hide the PHP version information from the public eyes as like the Apache Header information. This information helps the attackers to take quick decisions.
On the other hand, it is easy to follow. To do it, follow the below steps.
- Login into WHM first.
- Now go to PHP Configuration Editor under Service Configuration.
- Now disable (Keep it Off) expose_php options.

Now, no one can get the PHP version information of your cPanel server.
15. Disable FTP and instead use SFTP
FTP is popular and reliable. But nowadays, using SFTP is increasing and recommended. FTP does not use encryption. For this reason, all the data is uploaded as plain text. The attackers may get access to your important information and even login credentials from here easily. Hence, using SFTP provides us security as it uses encryption for all types of data.
In general, SFTP is known as SSH File Transfer Protocol because it encrypts the data when using. No matter. You can run it on your server also.
To do this, follow the below steps.
- First login to your WHM or cPanel as admin or root user.
- Now go to FTP Server Configuration
- Now change the option Required (Command) from Encryption Support.
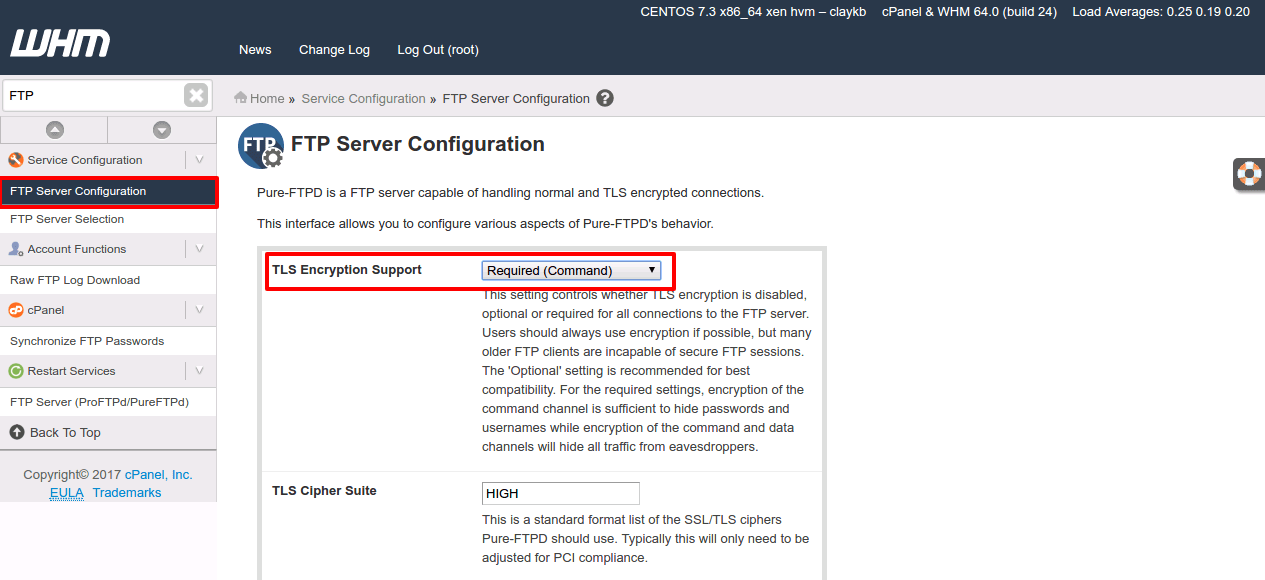
Thus enabling Pure-FTPD ensures a secure and reliable connection.
16. Securing cPanel and WHM access
Adding SSL when logging in cPanel or WHM will give extra safeguard. Using WHM, you can do it easily. The process is simple in terms of adding SSL. We need to force HTTPS URL to access the cPanel or WHM for making it the connection secure.
- First, log in to your WHM admin panel.
- Now go to Home and then Server Configuration and then Tweak Settings.
- Here go to the Redirection tab to enable SSL to your server. Just check the below image and red marking point to configure it accurately.

Now, the cPanel and WHM will run in secure connected areas.
17. Disable cPanel ID Login:
If you do not run a big server, then disabling cPanel ID login is a good decision.
Generally, we can log in to cPanel using two methods. One is using cPanel default username and password and another is using cPanel ID.
In case of small server, it is good practice to login using standard or default cPanel username and password.
Those who need to employ a big team to manage their server or adding a new engineer is common. They may use cPanel ID as it provides equal rights and access to all services among this ID.
But keeping it disabled for the small owner is a good practice to enrich security.
How to do it?
- First login to WHM.
- From Home, go to Security Center and then click on Manage External Authentication.
- Now disable the cPanel ID login from here. Please check the screenshot.

Thus, it gives some extra security on your server.
To Conclude It Up:
If you follow the above 17 methods in your VPS or Dedicated server, it will ensure the highest level of security in the cPanel. It would be tough to attack the server externally or internally. It will surely reduce threats on the server.
Furthermore, if you have any questions regarding cPanel security, contact us at any time. Our experts will be happy if they can support you safe in the digital world. Hence, never hesitate to share your opinion or you can add your methods or Ways for Enhancing cPanel Security. All the best.