In this world of WordPress, having a Website is very easy. And maintaining that website is even easier! To showcase the products, Businessmen need to update their website frequently. But not everyone can maintain those on their own. Today, we will discuss how to upload new images with Elementor plugin in WordPress within few minutes!
Step 1: Log In
At first, get your WordPress Username and Password. Open a browser and go to www.yourwebsite.com/wp-admin. Then put your username, password in place and log in.

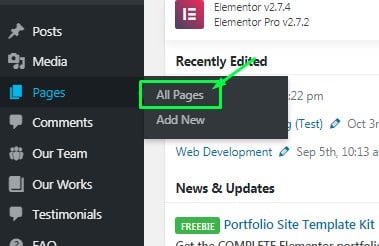
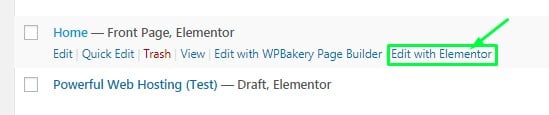
Step 2: Find A Page Where You Want To Upload Images
On the left-hand side of your screen, find the tab ‘Pages’ and click on to it. It will take you to edit or access all pages. Then, move the cursor at the Page that where you want to upload new images. You will see 3 new options appear. Now click on “Edit with Elementor.”
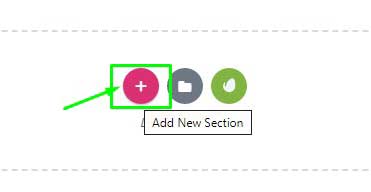
Step 3: Choose The Position Where You Want To Upload Images
After opening up your editing panel, go to that position or place where you want to upload new Images. Click on the ‘+’ to make a new row of images.
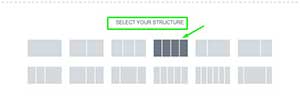
Now, set your column numbers. For example, pick 4 columns if you want to show 4 images in 1 row side-by-side.
Step 4: Edit Few Settings To Upload Images
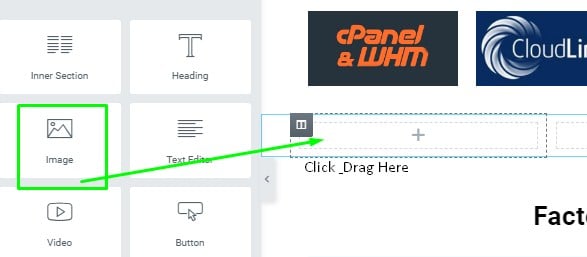
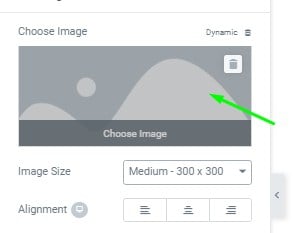
Now as your layout is ready, you can add images. Click on the box and drag the element ‘Image’ from the panel on the left-hand side. Then click on the ‘edit’ icon of the image box. Next, you can select the dimension of the image in the settings on the left of the screen. Also select if you want to make this image just a media-file, an Attachment page or link it to another page. Do the same for the entire row.
Step 5: Upload Images
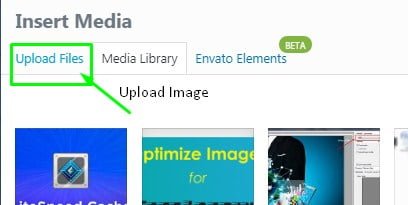
After completing the settings of the images, it’s time to finally upload them. Click on the ‘edit’ icon of the image box and then upload there. A media library will open. Upload your image there if the image is not already kept in the library. Select it; write necessary ‘Title,’ ‘Caption,’ ‘Alt Name’ etc and hit ‘Insert’ at the bottom. You will see the image is set on the page. Repeat the process for the other images. After finishing the upload, don’t forget to hit ‘UPDATE’ on the bottom-left corner to save your work. Then visit the page that you just have made changes. If you are not satisfied with your work, try to edit them and make adjustments. Play with the settings and notice the changes. You will eventually understand how it is working.
Last Word
Just like this, you can also edit your previous other images to make adjustments in the way you want to. Note that, before uploading, you must need to optimize the images. Otherwise your website will become heavy with large images and won’t load quickly. This is something that you definitely don’t want.